Documentation
Complete technical guide for installing, configuring, and using LoRA Craft.
Table of Contents
Prerequisites
Hardware Recommendations
- GPU: NVIDIA GPU with CUDA support
- 8GB VRAM: Small models (0.6B - 1.7B parameters)
- 12GB VRAM: Medium models (3B - 4B parameters)
- 16GB+ VRAM: Large models (7B - 8B parameters)
- RAM: Minimum 32GB system memory
- Storage: At least 64GB free disk space for models and datasets
Software Requirements
- Operating System: Windows, Linux, or macOS
- Python: Version 3.11 or higher
- CUDA: CUDA Toolkit 12.8 or compatible version
- Git: For cloning the repository
Installation
LoRA Craft supports two installation methods: Docker (recommended for most users) and Native (for development or advanced users).
Docker vs Native Installation
| Feature | Docker | Native |
|---|---|---|
| Setup Time | 5-10 minutes | 15-30 minutes |
| Dependency Management | Automatic | Manual |
| GPU Support | Automatic detection | Requires CUDA setup |
| Platform Support | Windows (WSL2), Linux, macOS* | Linux, Windows* |
| Updates | Simple rebuild | Manual package updates |
| Isolation | Fully isolated | System-wide install |
| Best For | Production, Windows users | Development, debugging |
*macOS Docker runs without GPU; Windows native requires WSL2 for GPU support.
See DOCKER-QUICKSTART.md for platform-specific Docker setup guides.
Docker Installation (Recommended)
Docker provides a pre-configured environment with all dependencies, CUDA runtime, and automatic GPU detection.
Prerequisites
- Docker 20.10+ and Docker Compose 2.0+
- NVIDIA Driver 535+ on host
- Windows: Docker Desktop with WSL2
- Linux: NVIDIA Container Toolkit
- macOS: Docker Desktop (CPU-only, no GPU)
Quick Setup
# Clone repository
git clone https://github.com/jwest33/lora_craft.git
cd lora_craft

# Optional: Configure environment
cp .env.example .env

# Start application (builds on first run)
docker compose up -d

# View logs
docker compose logs -f

# Access at http://localhost:5000
First startup takes 5-10 minutes to download base image (~5GB) and install PyTorch.
What’s Included
- NVIDIA CUDA 12.8 runtime with cuDNN
- Python 3.11 with all dependencies
- PyTorch 2.8.0 with CUDA support
- nvidia-smi for GPU monitoring
- Persistent volumes for data
- Health checks and monitoring
Docker Commands Reference
# Check status
docker compose ps

# Stop application
docker compose down

# Restart
docker compose restart

# View logs
docker compose logs -f

# Check GPU
docker compose exec lora-craft nvidia-smi

# Access shell
docker compose exec lora-craft bash

# Update to latest
git pull && docker compose build && docker compose up -d

# Clean rebuild
docker compose down
docker compose build --no-cache
docker compose up -d
Volume Management
Docker automatically mounts these directories:
| Local | Container | Purpose |
|---|---|---|
./outputs/ |
/app/outputs |
Model checkpoints |
./exports/ |
/app/exports |
GGUF exports |
./configs/ |
/app/configs |
Configurations |
./uploads/ |
/app/uploads |
Dataset uploads |
./logs/ |
/app/logs |
Application logs |
Named volumes (in Docker):
huggingface-cache- HuggingFace modelstransformers-cache- Transformers cachedatasets-cache- HuggingFace datasetstorch-cache- PyTorch cache
To backup: Copy local directories above. Named volumes persist across container restarts.
Native Installation
Step 1: Clone the Repository
git clone https://github.com/jwest33/lora_craft.git
cd lora_craft
Step 2: Install PyTorch with CUDA Support
Install PyTorch with CUDA 12.8 support:
pip install torch torchvision --index-url https://download.pytorch.org/whl/cu128
For other CUDA versions, visit PyTorch’s installation page.
Step 3: Install Dependencies
pip install -r requirements.txt
This will install all required packages including:
- Unsloth (optimized training framework)
- Transformers and PEFT (model handling)
- Flask and SocketIO (web interface)
- Training utilities (accelerate, TRL, bitsandbytes)
Step 4: Verify Installation
Check that your GPU is accessible:
python -c "import torch; print(f'CUDA available: {torch.cuda.is_available()}')"
You should see CUDA available: True.
Step 5: Start Application
python server.py
Access the web interface at http://localhost:5000.
User Guide
Step 1: Model Selection
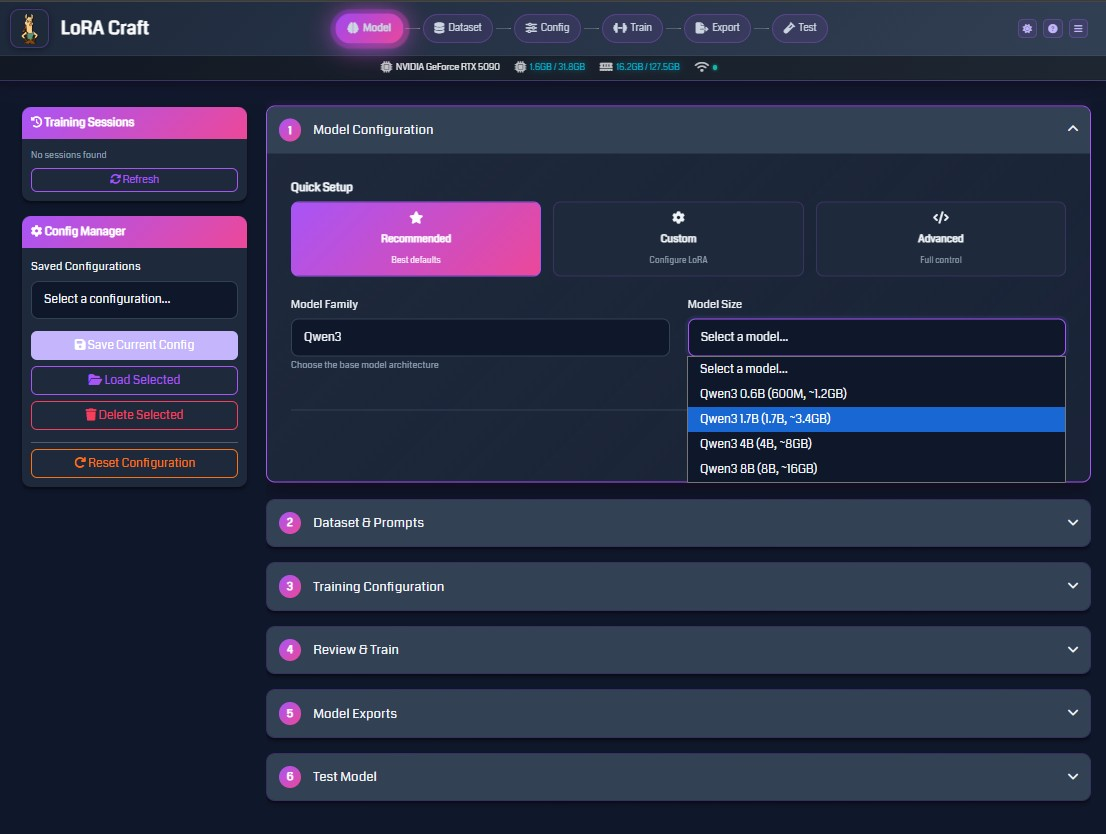
The Model Configuration page allows you to select the base model for fine-tuning.
Quick Setup Options
- Recommended: Uses best default settings for most use cases
- Custom: Configure LoRA parameters (rank, alpha, dropout)
- Advanced: Full control over all training parameters
Model Family
Choose from several model families:
- Qwen3: Efficient models ranging from 0.6B to 8B parameters
- Llama: Popular open-source models
- Mistral: High-quality instruction-following models
- Phi: Microsoft’s compact models
Model Size Selection
Select a model size based on your available VRAM:
- 0.6B - 1.7B: Works on 4GB+ VRAM
- 3B - 4B: Requires 8GB+ VRAM
- 7B - 8B: Requires 16GB+ VRAM
LoRA Configuration (Custom/Advanced)
- LoRA Rank: Controls adapter capacity (typical: 8-32)
- LoRA Alpha: Scaling factor for adapter (typically 2x rank)
- LoRA Dropout: Regularization to prevent overfitting (typical: 0.0-0.1)
Step 2: Dataset Configuration
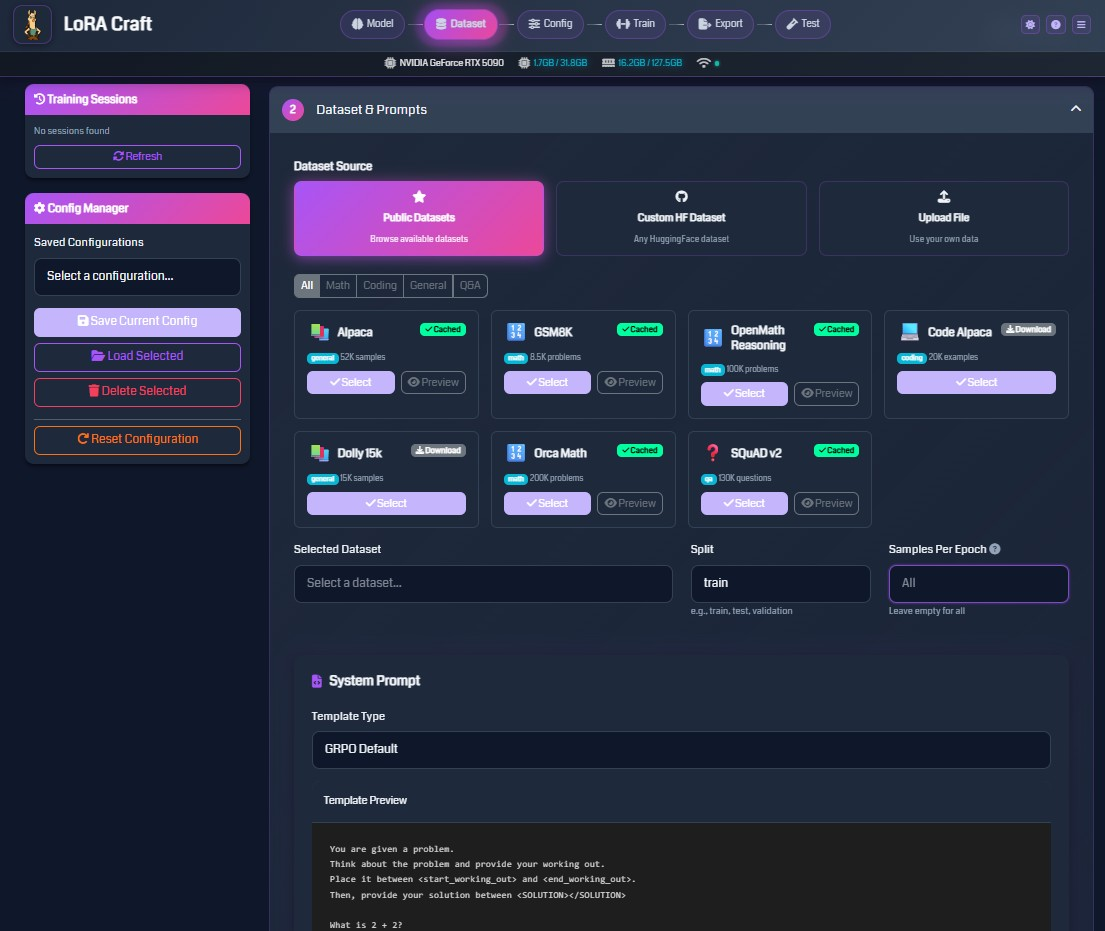
Configure the training data for your model.
Dataset Source Options
- Public Datasets: Browse curated datasets from HuggingFace
- Filter by category: Math, Coding, General, Q&A
- View dataset size and sample count
- Preview dataset samples before training
- Custom HF Dataset: Enter any HuggingFace dataset path
- Format:
username/dataset-name - Specify split (train, test, validation)
- Format:
- Upload File: Use your own data
- Supported formats: JSON, JSONL, CSV, Parquet
- Maximum size: 10GB
Popular Datasets
- Alpaca (52K samples): General instruction-following
- GSM8K (8.5K problems): Grade school math reasoning
- OpenMath Reasoning (100K problems): Advanced math problems
- Code Alpaca (20K examples): Code generation tasks
- Dolly 15k (15K samples): Diverse instruction tasks
- Orca Math (200K problems): Math word problems
- SQuAD v2 (130K questions): Question answering
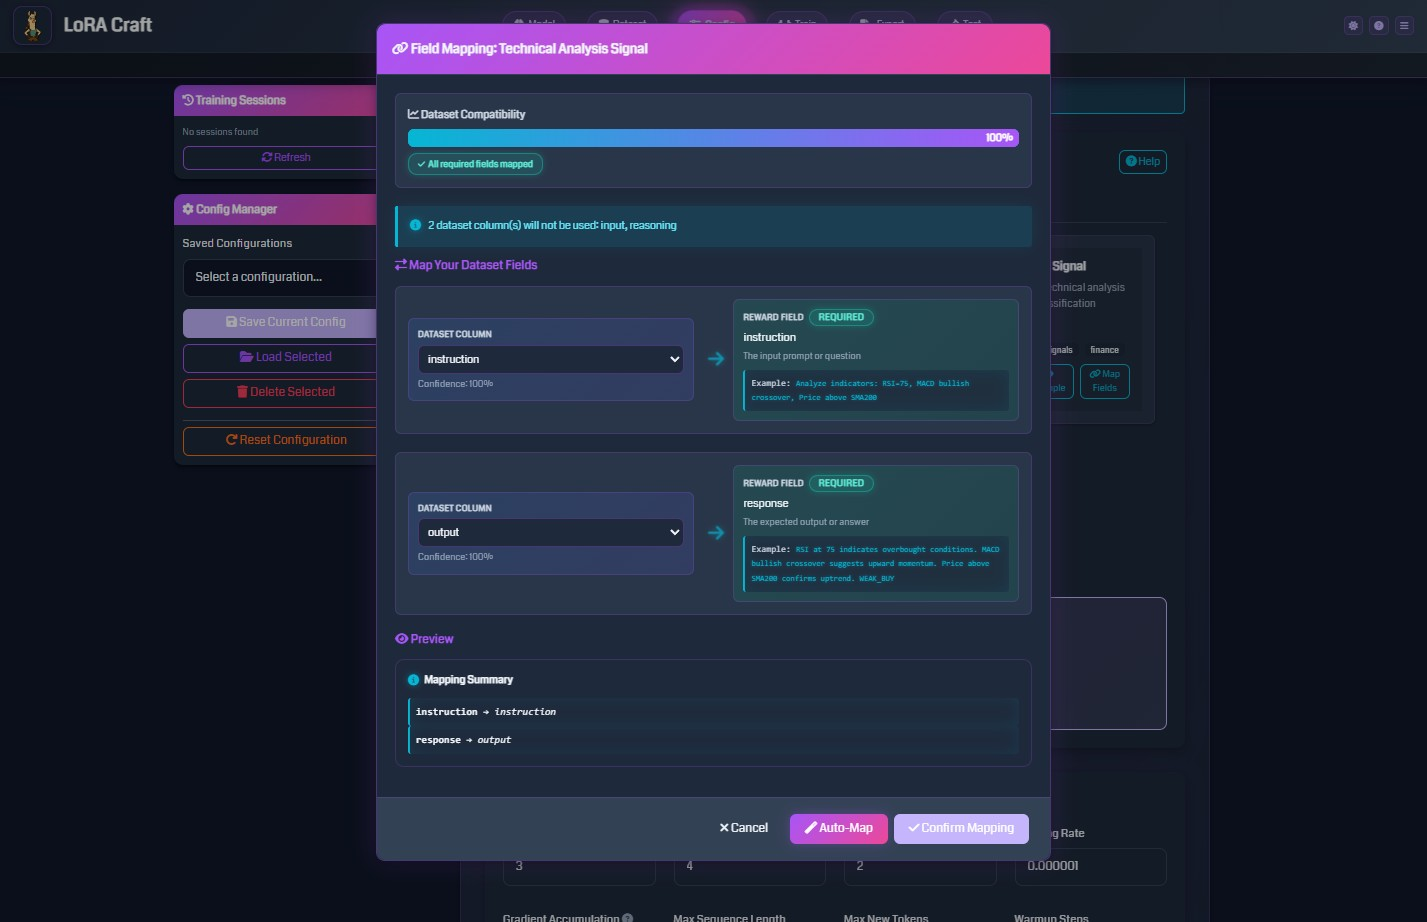
Field Mapping
Map your dataset columns to expected fields:
- Instruction: The input prompt or question
- Response: The expected output or answer
The system auto-detects common field names (question, answer, prompt, completion, etc.).
System Prompt Configuration
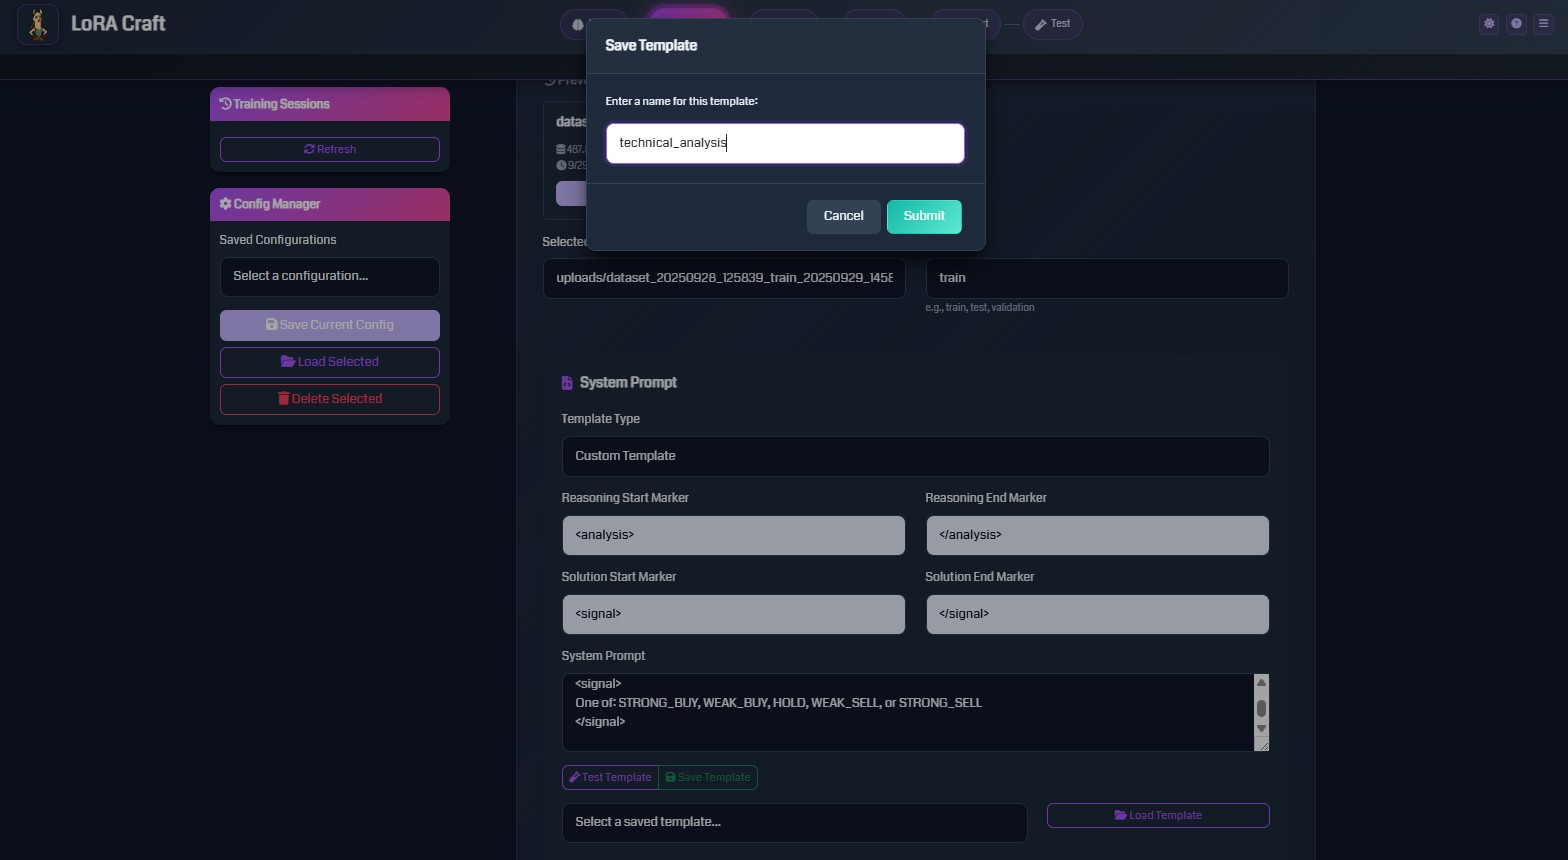
Define the instruction format for your model:
- Template Type: Choose GRPO Default or create custom templates
- System Prompt: Instructions given to the model
- Reasoning Markers: Tags to structure model thinking process
- Solution Markers: Tags to identify final answers
Step 3: Training Configuration
Configure hyperparameters for the training process.
Essential Parameters
Training Duration
- Epochs: Number of complete passes through the dataset (typical: 1-5)
- Samples Per Epoch: Limit samples per epoch, or use “All” for full dataset
Batch Settings
- Batch Size: Samples processed simultaneously (typical: 1-4)
- Gradient Accumulation Steps: Effective batch size multiplier (typical: 4-8)
- Effective batch size = batch_size × gradient_accumulation_steps
Learning Rate
- Learning Rate: Step size for model updates (typical: 5e-5 to 5e-4)
- Warmup Steps: Gradual learning rate increase at start (typical: 10-100)
- LR Scheduler: Learning rate adjustment strategy
constant: No change during traininglinear: Linear decay from peak to zerocosine: Smooth cosine decay
Optimization
- Optimizer: Algorithm for updating model weights
paged_adamw_32bit: Memory-efficient (recommended)adamw_8bit: More memory-efficient
- Weight Decay: Regularization to prevent overfitting (typical: 0.001-0.01)
- Max Gradient Norm: Gradient clipping threshold (typical: 0.3-1.0)
GRPO-Specific Parameters
- KL Penalty: Prevents model from deviating too far from base model (typical: 0.01-0.1)
- Clip Range: PPO-style clipping for stable training (typical: 0.2)
- Importance Sampling Level: Token-level or sequence-level weighting
Generation Parameters
- Max Sequence Length: Maximum input length in tokens (typical: 1024-4096)
- Max New Tokens: Maximum generated response length (typical: 256-1024)
- Temperature: Randomness in generation (0.7 = balanced, lower = deterministic)
- Top-P: Nucleus sampling threshold (typical: 0.9-0.95)
Pre-training Phase
Optional supervised fine-tuning phase before GRPO:
- Enabled: Toggle pre-training on/off
- Epochs: Number of pre-training epochs (typical: 1-2)
- Max Samples: Limit pre-training samples (or use “All”)
- Learning Rate: Separate learning rate for pre-training (typical: 5e-5)
Pre-training helps the model learn output formatting before reinforcement learning.
Step 4: Reward Functions
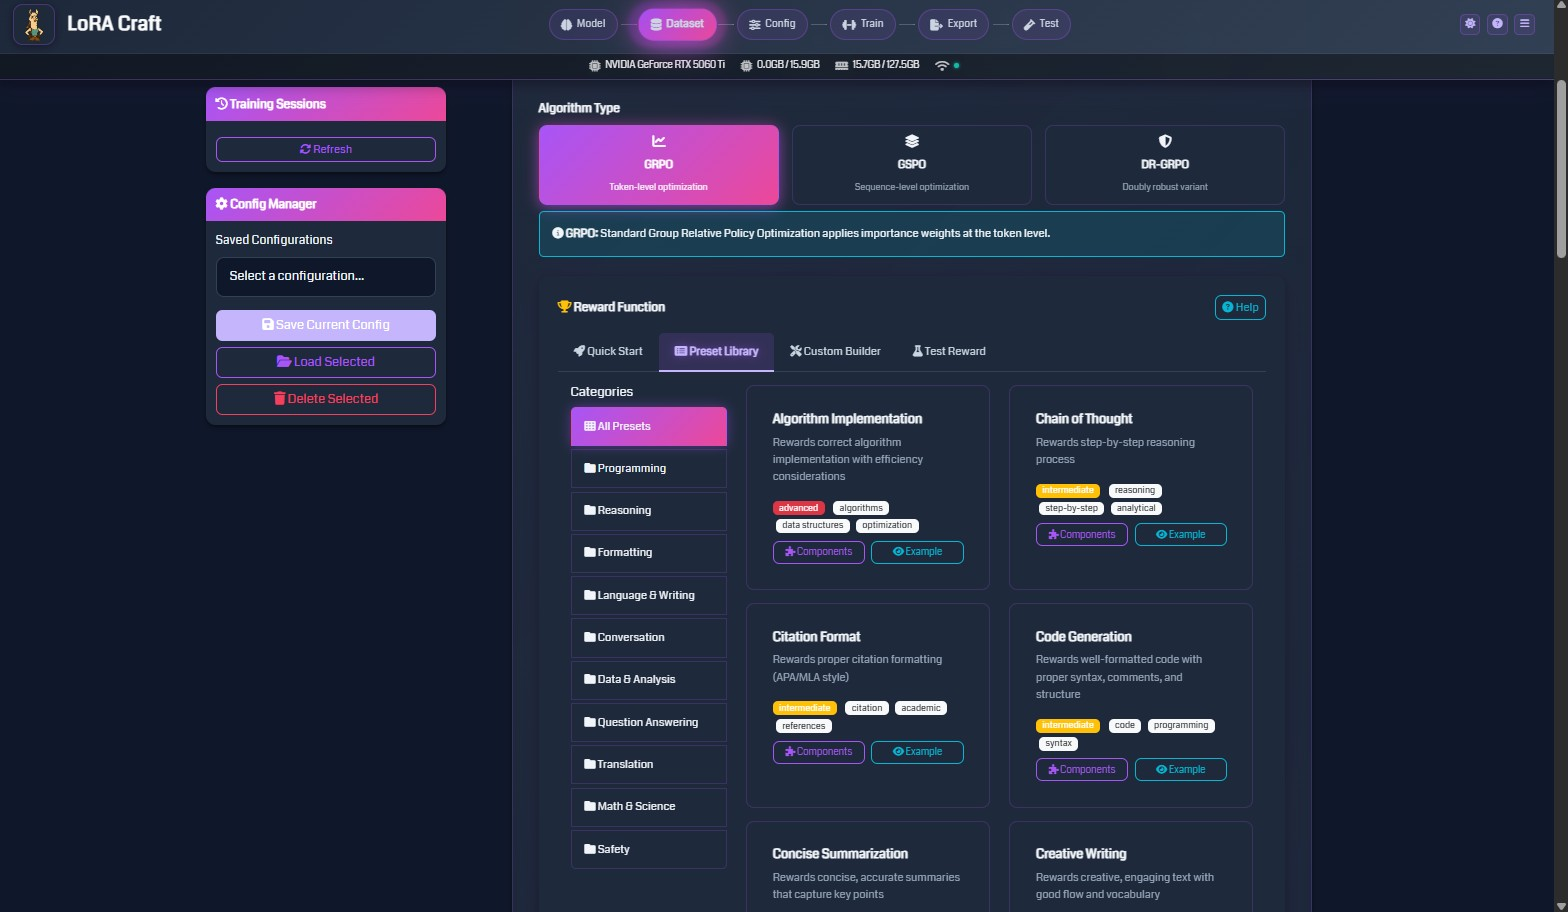
Reward functions evaluate model outputs and guide training. Choose functions that match your task.
Reward Function Categories
Algorithm Implementation
- Rewards correct algorithm implementation with efficiency considerations
- Use for: Code generation, algorithm design
Chain of Thought
- Rewards step-by-step reasoning processes
- Use for: Math problems, logical reasoning, complex analysis
Citation Format
- Rewards proper citation formatting (APA/MLA style)
- Use for: Academic writing, research tasks
Code Generation
- Rewards well-formatted code with proper syntax and structure
- Use for: Programming tasks, code completion
Concise Summarization
- Rewards accurate, concise summaries that capture key points
- Use for: Text summarization, data reporting
Creative Writing
- Rewards engaging text with good flow and vocabulary
- Use for: Content generation, storytelling
Math & Science
- Rewards correct mathematical solutions and scientific accuracy
- Use for: Math problems, scientific reasoning
Programming
- Rewards executable, efficient code
- Use for: Software development tasks
Reasoning
- Rewards logical reasoning and inference
- Use for: General problem-solving
Question Answering
- Rewards accurate, relevant answers
- Use for: Q&A systems, information retrieval
Configuring Reward Functions
-
Select Algorithm Type: GRPO (standard), GSPO (sequence-level), or OR-GRPO (robust variant)
- Choose Reward Source:
- Quick Start: Auto-configured based on dataset
- Preset Library: Browse categorized reward functions
- Custom Builder: Create custom reward logic (advanced)
- Map Dataset Fields:
- Instruction: Field containing the input prompt
- Response: Field containing the expected output
- Additional fields may be required depending on the reward function
- Test Reward: Verify reward function works with sample data before training
Step 5: Training & Monitoring
Once training starts, monitor progress through real-time metrics.
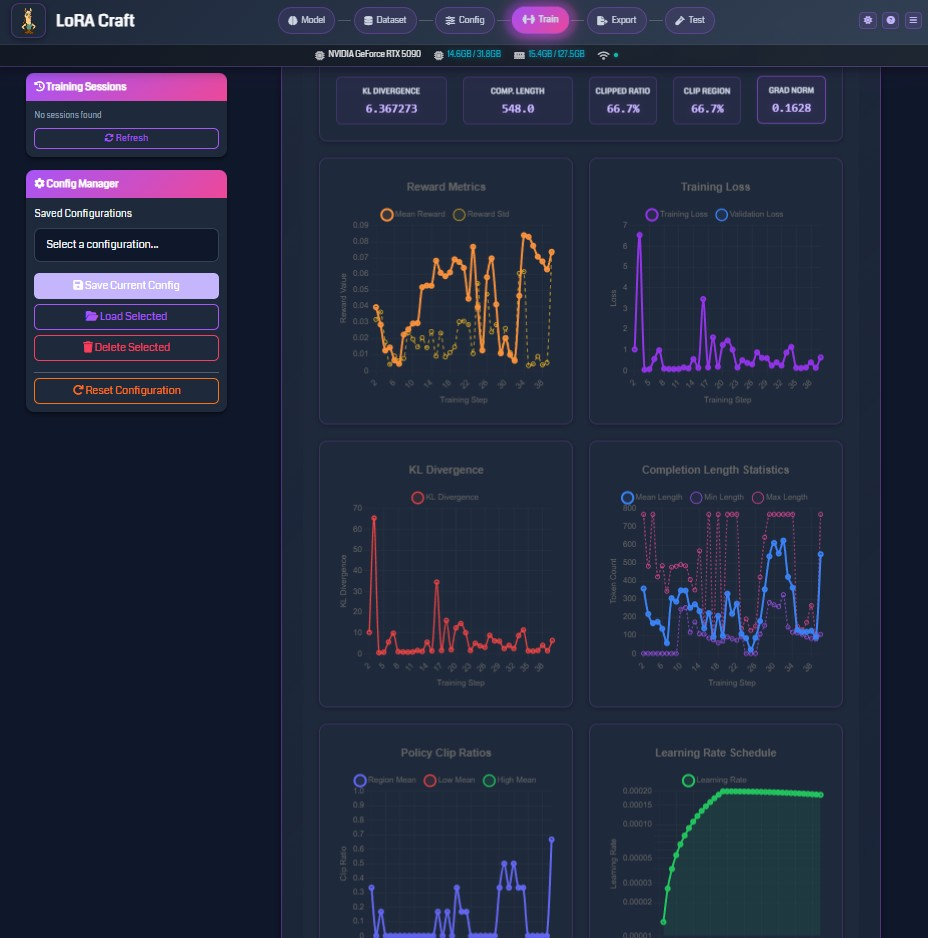
Training Metrics Dashboard
Top Metrics Bar
- KL Divergence: Measures model deviation from base model (lower is more conservative)
- Completion Length: Average length of generated responses
- Clipped Ratio: Percentage of updates clipped by PPO (indicates training stability)
- Clip Reason: Whether clipping is due to min or max bounds
- Grad Norm: Gradient magnitude (monitors training health)
Reward Metrics Chart
- Mean Reward: Average reward across training samples
- Reward Std: Standard deviation of rewards (measures consistency)
- Tracks how well the model is learning to maximize rewards
Training Loss Chart
- Training Loss: Primary optimization objective
- Validation Loss: Performance on held-out data (if validation set provided)
- Both should decrease over time
KL Divergence Chart
- Tracks how much the model diverges from the base model
- Should remain relatively stable (controlled by KL penalty)
Completion Length Statistics
- Mean Length: Average response length
- Min Length: Shortest response
- Max Length: Longest response
- Helps identify if model is generating appropriate response lengths
Policy Clip Ratios
- Target Mean: Desired clip ratio
- Clip Mean: Actual clip ratio
- Clip Median: Median clip ratio
- Indicates training stability (high clipping = aggressive updates)
Learning Rate Schedule
- Shows learning rate over training steps
- Helps verify scheduler configuration
Training Controls
- Stop Training: Gracefully halt training and save current checkpoint
- View Logs: Access detailed training logs
- Session Management: Track multiple training sessions
Training Sessions
The left sidebar shows all training sessions:
- Active sessions show real-time status
- Completed sessions remain available for review
- Click a session to view its metrics and model path
Step 6: Model Export
After training completes, export your model for deployment.
Export Formats
HuggingFace Format
- Standard format for Transformers library
- Includes base model + LoRA adapter
- Location:
outputs/<session_id>/
GGUF Format
- Optimized format for llama.cpp, Ollama, LM Studio
- Multiple quantization levels available:
- Q4_K_M: 4-bit quantization (balanced)
- Q5_K_M: 5-bit quantization (higher quality)
- Q8_0: 8-bit quantization (best quality)
- F16: 16-bit floating point (no quantization)
- Location:
exports/<session_id>/
Quantization Options
Quantization reduces model size for deployment:
- Q4_K_M: ~4GB for 7B model (recommended for most users)
- Q5_K_M: ~5GB for 7B model (better quality)
- Q8_0: ~8GB for 7B model (minimal quality loss)
- F16: ~14GB for 7B model (no quality loss)
Using Exported Models
With llama.cpp
./main -m exports/<session_id>/model-q4_k_m.gguf -p "Your prompt here"
With Ollama
ollama create my-model -f exports/<session_id>/Modelfile
ollama run my-model
With LM Studio
- Open LM Studio
- Navigate to “Local Models”
- Click “Import” and select your GGUF file
Step 7: Testing Models

Test your fine-tuned model with custom prompts.
Interactive Testing
- Select Model: Choose from trained models or active training sessions
- Enter Prompt: Type or paste your test question
- Configure Generation:
- Temperature: Control randomness (0.1 = deterministic, 1.0 = creative)
- Max Tokens: Maximum response length
- Top-P: Nucleus sampling threshold
- Generate: Click “Test Model” to generate response
Batch Testing
Test multiple prompts at once:
- Upload a file with test prompts (one per line)
- Configure generation parameters
- Run batch test
- Export results to JSON or CSV
Evaluation with Reward Functions
Evaluate model outputs using the same reward functions from training:
- Select reward function
- Enter prompt and expected response
- Generate model output
- View reward score and feedback
This helps quantify model improvement on your specific task.
Key Concepts
What is GRPO (Group Relative Policy Optimization)?
GRPO is a reinforcement learning algorithm for training language models. Unlike supervised learning (which simply teaches the model to imitate examples), GRPO teaches the model to maximize rewards.
How GRPO Works:
- Model generates multiple responses for each prompt
- Reward function scores each response
- Model learns to increase probability of high-reward responses
- Model learns to decrease probability of low-reward responses
Benefits:
- Models learn to optimize for specific objectives (correctness, format, style)
- Better generalization than pure supervised learning
- Can improve beyond training data quality
GRPO vs Other Algorithms:
- GRPO: Token-level importance weighting (standard)
- GSPO: Sequence-level optimization (simpler, less granular)
- OR-GRPO: Outlier-robust variant (handles noisy rewards better)
What are LoRA Adapters?
LoRA (Low-Rank Adaptation) is a parameter-efficient fine-tuning method.
Key Concepts:
- Instead of updating all model parameters (billions), LoRA adds small “adapter” layers
- Adapters are typically 1-2% the size of the full model
- Base model remains frozen, only adapters are trained
- Multiple adapters can be applied to the same base model
Benefits:
- Memory Efficient: Train on consumer GPUs (4-8GB VRAM)
- Fast Training: Fewer parameters to update
- Easy Sharing: Adapter files are small (typically 10-100MB)
- Modular: Switch adapters for different tasks
LoRA Parameters:
- Rank: Number of dimensions in adapter (higher = more capacity, slower training)
- Alpha: Scaling factor (controls adapter influence)
- Dropout: Regularization to prevent overfitting
Understanding Reward Functions
Reward functions are Python functions that evaluate model outputs and return scores.
Components of a Reward Function:
- Input: Model’s generated response + reference data
- Evaluation Logic: Checks correctness, format, quality
- Output: Numerical score (typically 0.0 to 1.0)
Example: Math Reward Function
def math_reward(response, expected_answer):
    # Extract answer from response
    model_answer = extract_solution(response)

    # Check correctness
    if model_answer == expected_answer:
        return 1.0  # Correct
    else:
        return 0.0  # Incorrect
Types of Reward Functions:
- Exact Match: Binary reward (correct/incorrect)
- Partial Credit: Gradual scoring (0.0 to 1.0)
- Multi-Component: Combines multiple criteria (correctness + format + efficiency)
- Heuristic: Rule-based evaluation
- Model-Based: Uses another model to evaluate quality
Best Practices:
- Start with simple, interpretable reward functions
- Ensure rewards align with your desired behavior
- Test rewards on sample data before training
- Monitor reward distributions during training
Understanding System Prompts
System prompts define the instruction format and expected output structure.
Components:
- System Message: High-level instructions for the model
- Instruction Template: How to format input prompts
- Response Template: Expected output structure
- Special Markers: Tags for reasoning and solutions
Example System Prompt (GRPO Default):
You are given a problem.
Think about the problem and provide your working out.
Place it between <start_working_out> and <end_working_out>.
Then, provide your solution between <SOLUTION></SOLUTION>
Why Use Structured Outputs?
- Separates reasoning from final answer
- Makes reward function evaluation easier
- Improves model interpretability
- Enables extraction of specific components
Troubleshooting
Docker-Specific Issues
GPU Not Detected in Container
Symptom: Container logs show “CUDA Available: False” or “GPU Count: 0”
Solutions:
- Verify GPU works with Docker:
docker run --rm --gpus all nvidia/cuda:12.8.0-base-ubuntu22.04 nvidia-smiIf this fails, your Docker GPU setup needs configuration.
- Check docker-compose.yml has correct GPU configuration:
```yaml
runtime: nvidia
environment:
- NVIDIA_VISIBLE_DEVICES=all
- NVIDIA_DRIVER_CAPABILITIES=compute,utility ```
- For Docker Desktop (Windows/macOS):
- Restart Docker Desktop
- Settings → Resources → WSL Integration (ensure enabled)
- Verify NVIDIA driver installed on Windows host
- For Linux:
- Ensure NVIDIA Container Toolkit installed
- Run:
sudo nvidia-ctk runtime configure --runtime=docker - Restart Docker:
sudo systemctl restart docker
- Rebuild container:
docker compose down
docker compose up -d
Container Won’t Start - Entrypoint Error
Symptom: “exec /app/src/entrypoint.sh: no such file or directory”
Cause: Line ending issues when building on Windows
Solution:
# Rebuild without cache
docker compose build --no-cache
docker compose up -d
The Dockerfile automatically fixes line endings, so rebuilding should resolve this.
Port 5000 Already in Use
Symptom: “Error starting userland proxy: listen tcp4 0.0.0.0:5000: bind: address already in use”
Solutions:
- Change port in docker-compose.yml:
```yaml
ports:
- “5001:5000” # Use port 5001 on host ```
- Or set in .env file:
echo "PORT=5001" >> .env - Or stop conflicting service:
# Find process using port 5000
# Linux:
sudo lsof -i :5000
# Windows:
netstat -ano | findstr :5000
GPU Memory Issues
Problem: “CUDA out of memory” error during training
Solutions:
- Reduce batch size to 1
- Increase gradient accumulation steps (maintains effective batch size)
- Reduce max sequence length (e.g., 2048 → 1024)
- Use smaller model (e.g., 1.7B instead of 4B)
- Enable gradient checkpointing (trades compute for memory)
- Use 8-bit or 4-bit quantization (reduces memory usage)
Training Not Starting
Problem: Training session created but doesn’t start
Solutions:
- Check logs folder for error messages (
logs/) - Verify dataset downloaded successfully (check
cache/folder) - Ensure reward function is properly configured
- Check that all required fields are mapped
- Restart the Flask server and try again
Dataset Loading Errors
Problem: “Failed to load dataset” error
Solutions:
- Verify dataset name is correct (case-sensitive)
- Check internet connection for HuggingFace downloads
- For uploaded files, verify format:
- JSON: Must be list of objects or object with data field
- JSONL: One JSON object per line
- CSV: Must have column headers
- Parquet: Standard Apache Parquet format
- Ensure instruction and response fields exist in dataset
Slow Training Speed
Problem: Training is slower than expected
Solutions:
- Verify GPU is being used: Check system monitoring (top bar should show GPU usage)
- Reduce gradient accumulation steps (increases update frequency)
- Enable flash attention if using supported model (Llama, Mistral)
- Disable gradient checkpointing if memory allows
- Use larger batch size if VRAM permits
- Check that CUDA and PyTorch are properly installed
Model Generation Quality Issues
Problem: Model outputs are nonsensical or low quality
Solutions:
- Check reward signal: Ensure rewards are varying (not all 0.0 or 1.0)
- Increase pre-training epochs: Model needs to learn format first
- Adjust KL penalty: Lower values allow more deviation from base model
- Verify dataset quality: Check that training data is clean and relevant
- Increase training epochs: Model may need more training time
- Check system prompt: Ensure it clearly describes expected output format
- Test with different temperatures: Lower temperature (0.3-0.5) for more deterministic outputs
WebSocket Connection Issues
Problem: Real-time metrics not updating
Solutions:
- Refresh browser page
- Check browser console for WebSocket errors (F12)
- Verify Flask server is running
- Check firewall settings (port 5000 must be accessible)
- Try a different browser (Chrome/Firefox recommended)
Export Failures
Problem: GGUF export fails or produces invalid files
Solutions:
- Ensure training completed successfully
- Check that model checkpoint exists (
outputs/<session_id>/) - Verify sufficient disk space for export
- Check logs for llama.cpp converter errors
- Try exporting with different quantization level
Technical Reference
API Endpoints
The Flask server provides RESTful API endpoints for programmatic access.
Training Endpoints
Start Training
POST /api/training/start
Content-Type: application/json

{
  "session_id": "unique-id",
  "config": { ... training configuration ... }
}
Stop Training
POST /api/training/stop
Content-Type: application/json

{
  "session_id": "session-id-to-stop"
}
List Training Sessions
GET /api/training/sessions
Dataset Endpoints
List Datasets
GET /api/datasets/list
Upload Dataset
POST /api/datasets/upload
Content-Type: multipart/form-data

[email protected]
Preview Dataset
POST /api/datasets/preview
Content-Type: application/json

{
  "path": "tatsu-lab/alpaca",
  "samples": 5
}
Model Endpoints
Test Model
POST /api/models/test
Content-Type: application/json

{
  "model_path": "outputs/session-id/",
  "prompt": "What is 2+2?",
  "temperature": 0.7,
  "max_tokens": 256
}
List Trained Models
GET /api/models/list
Export Model
POST /api/exports/create
Content-Type: application/json

{
  "session_id": "session-id",
  "format": "gguf",
  "quantization": "q4_k_m"
}
Configuration Endpoints
Save Configuration
POST /api/configs/save
Content-Type: application/json

{
  "name": "my-config",
  "config": { ... configuration object ... }
}
Load Configuration
GET /api/configs/load?name=my-config
List Configurations
GET /api/configs/list
WebSocket Events
Real-time updates are delivered via Socket.IO.
Connect to Socket
const socket = io('http://localhost:5000');
Subscribe to Training Updates
socket.on('training_update', (data) => {
  console.log('Step:', data.step);
  console.log('Loss:', data.loss);
  console.log('Reward:', data.reward);
});
Subscribe to System Updates
socket.on('system_update', (data) => {
  console.log('GPU Memory:', data.gpu_memory);
  console.log('GPU Utilization:', data.gpu_utilization);
});
Configuration File Format
Saved configurations are stored as JSON in the configs/ directory.
Example Configuration:
{
  "name": "math-reasoning-config",
  "model": {
    "name": "unsloth/Qwen3-1.7B",
    "lora_rank": 16,
    "lora_alpha": 32,
    "lora_dropout": 0.0
  },
  "dataset": {
    "source": "openai/gsm8k",
    "split": "train",
    "instruction_field": "question",
    "response_field": "answer",
    "max_samples": null
  },
  "training": {
    "num_epochs": 3,
    "batch_size": 1,
    "gradient_accumulation_steps": 8,
    "learning_rate": 0.0002,
    "warmup_steps": 10,
    "weight_decay": 0.001,
    "max_grad_norm": 0.3,
    "lr_scheduler_type": "constant",
    "optim": "paged_adamw_32bit",
    "max_sequence_length": 2048,
    "max_new_tokens": 512,
    "temperature": 0.7
  },
  "grpo": {
    "kl_penalty": 0.05,
    "clip_range": 0.2,
    "importance_sampling_level": "token"
  },
  "reward": {
    "type": "preset",
    "preset_name": "math"
  },
  "pre_training": {
    "enabled": true,
    "epochs": 2,
    "max_samples": 100,
    "learning_rate": 0.00005
  }
}
Supported Dataset Formats
JSON Format
[
  {
    "instruction": "What is the capital of France?",
    "response": "The capital of France is Paris."
  },
  {
    "instruction": "Solve 2+2",
    "response": "2+2 = 4"
  }
]
JSONL Format
{"instruction": "What is the capital of France?", "response": "The capital of France is Paris."}
{"instruction": "Solve 2+2", "response": "2+2 = 4"}
CSV Format
instruction,response
"What is the capital of France?","The capital of France is Paris."
"Solve 2+2","2+2 = 4"
Parquet Format
- Standard Apache Parquet files with
instructionandresponsecolumns - Supports nested structures and efficient compression
Directory Structure
lora_craft/
├── cache/              # Cached datasets from HuggingFace
├── configs/            # Saved training configurations
├── core/               # Core training logic
├── docs/               # Documentation and example images
├── exports/            # Exported models (GGUF, etc.)
├── logs/               # Application and training logs
├── outputs/            # Training outputs (model checkpoints)
├── routes/             # Flask API routes
├── services/           # Business logic services
├── static/             # Static web assets (CSS, JS, images)
├── templates/          # HTML templates
├── uploads/            # Uploaded dataset files
├── utils/              # Utility functions
├── websockets/         # WebSocket handlers
├── server.py        # Application entry point
├── app_factory.py      # Flask application factory
├── constants.py        # Application constants
└── requirements.txt    # Python dependencies
Glossary
Adapter: Small trainable module added to a frozen base model (see LoRA)
Base Model: Pre-trained language model before fine-tuning
Batch Size: Number of samples processed simultaneously during training
CUDA: NVIDIA’s parallel computing platform for GPU acceleration
Epoch: One complete pass through the entire training dataset
Fine-tuning: Training a pre-trained model on new data for a specific task
GGUF: File format for quantized models (used by llama.cpp ecosystem)
Gradient Accumulation: Technique to simulate larger batch sizes with limited memory
Gradient Clipping: Technique to prevent exploding gradients by limiting their magnitude
GRPO: Group Relative Policy Optimization (reinforcement learning algorithm)
KL Divergence: Measure of how much the fine-tuned model differs from the base model
Learning Rate: Step size for model parameter updates
LoRA: Low-Rank Adaptation (parameter-efficient fine-tuning method)
Quantization: Reducing model precision (e.g., from 16-bit to 4-bit) to save memory
Reinforcement Learning: Training paradigm where model learns from reward signals
Reward Function: Function that evaluates model outputs and assigns scores
System Prompt: Instructions that define expected model behavior and output format
Token: Smallest unit of text processed by language models (roughly 3/4 of a word)
VRAM: Video RAM (GPU memory)
Warmup: Gradual increase of learning rate at training start
Additional Resources
Documentation
- Unsloth Documentation
- HuggingFace Transformers
- PEFT Library
- TRL (Transformer Reinforcement Learning)
Model Sources
Dataset Sources
Deployment Tools
Community & Support
License: MIT
Acknowledgments: Built with Unsloth, HuggingFace Transformers, and Flask.